
Jenkins
How to Use Docker in Jenkins CI/CD
If you’re working in software development and using Jenkins for your CI/CD, you’ll know Jenkins is a go-to automation tool, streamlining the CI/CD process. You’ll also know it can be a proper handful to work with. It’s complex and requires decent expertise to use effectively.
Recently, Docker integration with Jenkins has become popular. Docker has totally shaken up the container game, and many Jenkins users can’t wait to give it a spin in their CI/CD. However, taking a CI/build server like Jenkins and finding a way to create Docker images and then somehow build and deploy the container is easier said than done.
Docker is resource intensive, has complex file syntax, as well as numerous file formats and code to get your head around like Dockerfiles and Jenkinsfiles. It can also be a headache to put together, as almost all of it needs to be typed up manually.
In this article, we’ll take a look at what makes pairing Docker with Jenkins a tough nut to crack. We’ll also provide a solution to deploy Docker containers with Jenkins effortlessly using BuildMaster. This will take Jenkins artifacts and use Docker to build and deploy a container.

So, What is Docker Exactly?
Ok, quick 101. Docker is a platform designed to make it easier to develop, deploy, and run applications by using containers.
So, what’s a container? Imagine it as a lightweight, standalone, executable package that includes everything needed to run a piece of software. It includes code, runtime, libraries, and system tools, encapsulating an application and its dependencies.
There are legit reasons Docker is so widely used:
✔ All in One: Containers package an application and its dependencies into a single unit. This avoids the classic problem of “it works on my machine”. It guarantees that what works on a developer’s machine will also work on a tester’s or production server.
✔ Environment Consistency: With Docker, the application’s environment is consistent, regardless of where it runs. This eliminates unexpected behavior caused by differences between development and production environments.
✔ Simple Deployment: Docker simplifies the deployment process. Once an application is containerized, it can be easily moved and executed on any system that supports Docker, streamlining the deployment pipeline.
The Hurdles of Dockerizing in Jenkins CI/CD Pipelines
With Docker entering the scene, many are using it to containerize in their Jenkins CI/CD. And why wouldn’t they? It offers consistent environments, self-service, reproducibility, and improved visibility.
There are several problems you’re going to face trying to introduce it though:
- Complexity: Using it means everyone in your team suddenly needs a PhD in Docker. Building and deploying Docker containers is far from easy, and getting to grips with it can be a bit much, especially on top of Git and everything else your team is working with.
- Manual File Creation: Using Docker with Jenkins involves dealing with various file formats and code, including “Jenkinsfiles” and “Dockerfiles“. All files and commands are manually typed, requiring a hands-on approach to manage and execute tasks.
- Jenkins Limitations: Using Jenkins alone to containerize your applications is an uphill battle. As a CI/Build server, Jenkins will only be able to build the artifacts needed for the Docker container. To build and deploy the container, you’re going to have to find another way to get it done.
Whatever way you approach it, there’s no simple way of using them on their own to get around this.
What we can show you is how using BuildMaster can make the whole process easier. You’ll not only be able to take the Jenkins artifacts and containerize them using Docker but also do it with barely any knowledge of Docker itself.
BuildMaster: Containerize without Learning Docker
BuildMaster lets you containerize applications as part of the build/deploy process without everyone on the team needing to become a Docker expert.
- The wizard will walk you through every step of the process.
- What’s more, there’s almost no typing up code or commands needed.
This means that your developers can:
⭐ Use their preferred tools to code, build, test, and debug applications
⭐ Not worry about installing a Docker Engine on their desktop, which is often resource-intensive and slows things down
⭐ Work with Windows without having to context-switch to Linux tools
Besides that, there are a lot of other benefits to containerizing your application, such as improved portability, easier scalability, enhanced isolation, and simplified deployment and management processes.
Creating a Dockerized Application in BuildMaster
Containerizing your applications is quick and easy in BuildMaster, and involves creating, building, and finally containerizing the application. In this example, we’ll look at dockerizing a Python application.
Python is a good example due to it’s cross-platform compatibility/deployment flexibility. We’ll show how you can integrate your Jenkins artifacts into a BuildMaster pipeline to build and deploy a containerized Python application, bringing Jenkins and Docker together.
For a more detailed breakdown, you can read Integrating Jenkins with BuildMaster
Importing Jenkins Artifacts into BuildMaster
We’ll begin by importing our Jenkins artifacts into an existing Python application pipeline by adding a new Jenkins “CI Project” connection. From here we can connect to our Jenkins CI/Build server with our Jenkins Server URL, user name, and password (or API token).

We’ll also want to add a Docker connection if the application isn’t already configured to deploy using Docker.

Now Jenkins and Docker are both connected we’ll be able to import our Jenkins artifacts.

After that BuildMaster will create a container image using the build artifacts imported. You can do this easily using the “Build Docker Image” script template. This uses the “Build Artifacts” to build the Docker image, which will then push the new image to your Docker registry and associate it with your build.

Creating a Dockerfile
To complete the Docker Image script, you’ll also need a “Dockerfile”. A Dockerfile is a script that instructs Docker how to build a container image for your application.
If you haven’t worked with Docker before, the syntax can be a bit intimidating. BuildMaster helps here by managing the file for you. So, once you get it working, you don’t have to ever worry about using or mastering Docker.
Creating a Basic Docker File for Python
So, let’s look at some best practices for writing a basic Docker file for Python. It might seem scary at first but I assure you it’s pretty straightforward –the main thing is to keep it simple.
Make sure you first have a directory with all of your Python files, including the main script or application file and the requirements.txt. You’ll now need to create a file named Dockerfile in this directory with the following content:
# creates a layer from the ubuntu:22.04 Docker image.
FROM ubuntu:22.04

# adds files from your Docker client's current directory.
COPY . /app

# builds your application with make.
RUN make /app

# specifies what command to run within the container
CMD python /app/app.py
Here is a detailed breakdown of their Dockerfiles if you’re still having trouble.
Now you have your Dockerfile, simply running the “Build Docker Image” script you created will create your Dockerized App. Easy!
Deploying Your Dockerized Application the Easy Way
So now you have a Dockerized Application ready, you’ll want to get it deployed.
Your Application in a CI/CD Pipeline
When creating a dockerized application, BuildMaster will work through a Docker CI/CD pipeline. Pipelines are repeatable release processes that define the servers and environments your application will be deployed to.
The Docker pipeline includes five stages:

The first two steps, “Build” and “Containerize” will have been worked through when containerizing the application. The next steps will be the “Integration”, “Testing”, and “Production” stages where BuildMaster will deploy the application by pulling the container image from the Docker registry and then running it on our host.
Deploying your Application With Docker Run Config
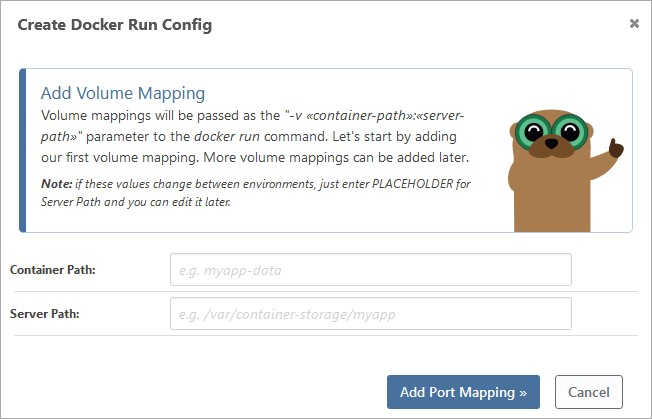
A “Docker Run Config” is a type of file used when deploying dockerized applications. When deploying a Docker container, you have to deal with a bunch of complex tasks such as mapping volumes, configuring ports, and setting up environment variables. BuildMaster streamlines all of this with the “Docker Run Config” file.
Creating one is just a simple case of following the setup steps in BuildMaster
A “Docker Run Config” file has multiple “instances” with different configurations based on the environment you’ll deploy to. You can control who has access to view or edit these instances based on the environment.

The easiest way to deploy a container image is to use this file with a “Deploy Docker Image” Script Template to deploy the Docker image associated with the current build.
Once you deploy the current build it will go through various environments in the pipeline (Integration, Testing, and Production). You’ll have the option to customize each of these environments, such as creating checks and approvals at each stage, deciding if the build moves to each stage manually or automatically, and specifying where you’ll be deploying to.

Docker and Jenkins Made Easy
Docker with Jenkins offers a great solution to CI/CD with containerization, but they don’t make it easy to do it effectively. Numerous configuration challenges, file formats and code to wrap your head around make it daunting to introduce to your development environment.
Thankfully using BuildMaster makes it easy for anyone to do, walking you through containerization with minimal Jenkins and Docker knowledge. This simplifies containerization, offering an efficient deployment process.
The fun doesn’t stop there though. To learn more about making Jenkins work for you, why not take a look at our free eBook “Level Up your Jenkins CI/CD“. Download the guide today!
