
Jenkins
How to Use Jenkins to Run Parameterized PowerShell Scripts
As a PowerShell pro, you may be looking to make your life easier and avoid becoming a bottleneck by letting others run PowerShell scripts. Adding what is basically a PowerShell GUI through Jenkins lets those who aren’t as familiar with PowerShell run them without expert intervention.
If you’re in a Jenkins-using organization, you’re likely looking to this tool to run your parameterized PowerShell projects. After all, the tool is already hard at work in your organization, and you are likely familiar with at least the basics.
If all you’re looking to do is very few, very simple parameterized PowerShell scripts in Jenkins, go for it—this article will show you how. But if you’re going to be doing a lot of complex parameterized PowerShell scripts, you’ll want to anticipate the problems you’re going to face doing this in Jenkins.
How to Use Jenkins to Run Parameterized PowerShell Scripts as Projects
Step 1: Install a fresh Jenkins instance on Windows
It’s good practice to begin this process with a fresh Jenkins installation.
Adding your PowerShell to an existing Jenkins can bog down the server, slowing it down and delaying work. It can also interfere with other jobs running on the server. Especially as you add PowerShell modules to the server to run your scripts.
Jenkins has a getting started tutorial to help you install Jenkins on Windows.
Step 2: Enable the PowerShell plugin
From the main dashboard, go to Manage Jenkins > Manage Plugins and search “PowerShell.”

Add the plugin and enable it. This will let Jenkins and PowerShell work together without a different console.
Step 3: Create a PowerShell Project (Job) and Add Parameters
Each PowerShell script you want to run will be its own Jenkins project. For this explanation, we’re going to use CreatedSharedMailBox.ps1.
From the main dashboard, go to “New Item,” and enter a name based on the script you want to run. Select “Freestyle project,” then click OK to create the project.

After creating the project, this will bring you to the “Configure Project” page.
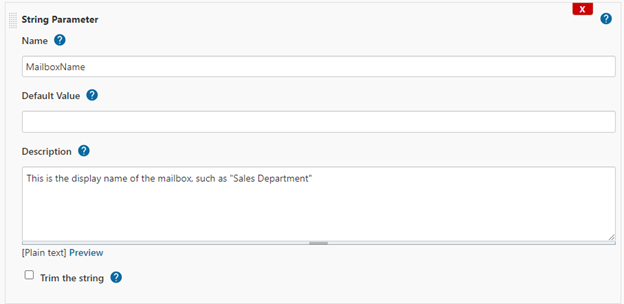
Enter the description and then check “This project is a parameterized item” from the list below. Then, start adding the parameters to your PowerShell script.

In our case, we’ll add three “string parameters” parameters: MailboxName, MailboxAlias, GrantPermissionToGroup.
Although Jenkins offers several options, when it comes to PowerShell scripts, you’ll mostly use Boolean (checkboxes), Choice (dropdown list), and String (Textbox) parameters.
Step 4: Prep Jenkins to Run PowerShell
In the “Build” part of the project settings, click “Add Build Step” and select “PowerShell”. This allows Jenkins to run the PowerShell script that we’ll paste in.

Step 5: Modify and Enter Your PowerShell Script
Before using a PowerShell script in Jenkins, you’ll need to modify it so that the parameters that users enter will be passed into your script.
This involves accessing and changing the variables you use from $ParameterName to $($env:ParameterName). You can also remove the Comment-Based Help and param() block, as Jenkins won’t use it.
Before
<#
.SYNOPSIS
Creates a shared Mailbox and grants a security group permission to use it
.PARAMETER MailboxName
This is the display name of the mailbox, such as "Sales Department"
.PARAMETER MailboxAlias
This is the email address before the @company.com, such as "sales"
.PARAMETER GrantPermissionToGroup
The security group that will have access to the box, such as "MarketingSG"
#>
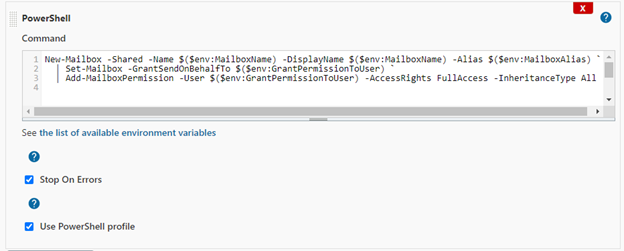
param($MailboxName, $MailboxAlias, $GrantPermissionToGroup)
New-Mailbox -Shared -Name $MailboxName -DisplayName $MailboxName -Alias $MailboxAlias `
| Set-Mailbox -GrantSendOnBehalfTo $GrantPermissionToUser `
| Add-MailboxPermission -User $GrantPermissionToUser -AccessRights FullAccess -InheritanceType All After (ready for Jenkins)
New-Mailbox -Shared -Name $($env:MailboxName) -DisplayName $($env:MailboxName) -Alias $($env:MailboxAlias) `
  | Set-Mailbox -GrantSendOnBehalfTo $($env:GrantPermissionToUser) `
  | Add-MailboxPermission -User $($env:GrantPermissionToUser) -AccessRights FullAccess -InheritanceType All
Once you’ve modified your script, you can now paste it into the PowerShell build step in Jenkins and save.

Step 6: Test/Run Your PowerShell Script
You (or anyone else with access) can now run the script using the “Build With Parameters” button that will appear on the main dashboard.
Clicking that button will display the parameters you created as an input form:

Once you enter the appropriate values, click the Build button. The script will start running, and you’ll be able to see the progress and results of the script by navigating to the “build” that was created.
⚠ Caution: Problems with Jenkins as your Script Runner⚠
Running your parameterized PowerShell scripts via Jenkins is not a foolproof or simple solution. Here are a few significant problems to anticipate (and some advice on how to avoid them).
👁 Continued Oversight Needed
You’re putting parameterized projects into Jenkins to help others (which ends up helping you, of course). You know what you’re doing with PowerShell, but you can’t always drop everything to help Jarod run his PowerShell scripts.
Jenkins parameterized projects don’t have strong input options like “required” fields or choosing multiple items from a list. Lesser-skilled PowerShell users working with your parameterized projects in Jenkins will need to be taught how to meticulously enter inputs and recognize errors in a script caused by bad inputs. At least, until a PowerShell and Jenkins expert can write code to detect bad input and generate an error in the script that novices can recognize.
Furthermore, Jenkins doesn’t directly inject variables into PowerShell. To create a GUI for PowerShell in Jenkins, you have to edit your PowerShell to get Jenkins to do this. This can lead to errors if you’re not careful when converting your scripts to run in Jenkins.
Making parameterized projects in Jenkins “Jarod-proof” takes a ton of work. It is possible: just master PowerShell, master Jenkins, and make sure everyone else who will maintain it knows how and will be very careful. That’s a lot of work to make less work for yourself.
If you’re just doing this for a few scripts, this amount of work might be acceptable. For anything more, you may want to consider a dedicated configuration tool, like Otter. This can simplify things significantly: you can just paste PowerShell right into Otter, no edits needed. Otter gives clear parameters and errors with no extra work.
🥵 True Self-Service is a LOT of Effort
Server targeting and orchestration take a lot of work to set up in Jenkins. Without an easy way to target servers or do orchestration, you will be called in to help Jarod (you’re back to being an involved bottleneck). And if he doesn’t call you in, you risk having to clean up Jarod’s messes.
To run scripts on servers other than the Jenkins controller, you have two paths:
- Write a new PowerShell script to run your script on another server remotely by starting an interactive session, running a remote command, running the script, and establishing a persistent connection.
- Have Jenkins run your PowerShell script by delegating to a Jenkins Agents
Once you know how to do either method, you’re good. But this is rather difficult to configure in Jenkins. At least, at first.
But beware: If your targeting/orchestration is complicated, this complex process gets exponentially more complex. In Jenkins, this requires learning how to write Jenkins Pipelines, a Groovy-based scripting language. You can then create “pipeline projects,” which will run your PowerShell script projects. Imagine trying to manually rig up complex orchestration scenarios like targeting servers sequentially or with complex branching/iterating logic.
For complex targeting and orchestrations, you’re almost certainly better off with a dedicated tool. Even though you’re learning a new tool, it’s more likely to yield a more reliable, less buggy result. For example, a dedicated tool like Otter requires much less work and includes input options and server targeting and orchestration out-of-box: see How to Create a GUI for Scripts with Input Forms.
😡Limited Visibility for Everyone
Because Jenkins wasn’t meant to handle PowerShell, its visibility isn’t what you’d get from a dedicated tool. The lack of good visibility can impede self-service and can send Jarod back to your doorstep. For this section, we’ll use Otter for our dedicated tool examples.
⚠ “Jenkins Logs” are just a flat, uncolored log file that says, “console output.” It’s very easy to get lost with debug, info, warnings, and error messages. Compare with Otter’s color-coded logs. These show debug, info, warnings, errors, etc., and use colors to call your attention to different messages. Most other programs, like Jenkins, do not have warnings. They either crash or they don’t.
⚠ You can log far fewer messages. If you log too many, you’ll bog down your Jenkins server. This slows down build speeds and increases the risk of crashes. Fewer messages make the log easier to read, as there’s less to read. But if there’s a problem, it will be hard to figure out what happened. This is slow, frustrating, and probably fruitless. Compare this with Otter, whose detailed logs centralize all information a user needs to solve a problem without slowing down the service.
⚠ Verbose logging is challenging. If you want to log a lot of messages to the console, it will be difficult for your user to follow. Alternatively, you could write some messages to a text file, and then capture the log file as a Jenkins artifact. This gets complicated in PowerShell because you’ll have to modify your script to work with Jenkins, and maintain Jenkins artifacts. Compare with Otter, where logs are much easier to navigate.
⚠ Script logs lack context. As you log more and more messages, it’ll be hard to tell which log went with which part of your script. You could use a third-party logging tool for your scripts, but this will make it harder to associate which logs went with which scripts. Compare this with Otter, which has scoped logs to associate code with the appropriate log line.
⚠ Anyone can see sensitive information in your debug logs. The solution is to be very careful about what you log to Jenkins. If you have sensitive information like API keys or passwords, you’ll need to find a better place to store it than the Jenkins logs. Compare this with Otter, whose admins can restrict logs and control who can see debug logs to protect sensitive information.
✔ Solution: Use the Right Tool for the Job
We showed you how to use Jenkins for your parameterized PowerShell scripts (because that’s what you said you wanted to do). This is a great idea for getting your colleagues out of your hair, letting them run PowerShell on their own without causing devastation.
But it’s not the best idea, since Jenkins wasn’t meant for Ops, and the work needed to reduce your PowerShell workload is significant. Especially for complicated scripts and orchestrations, using a dedicated tool like Otter. There’s a really powerful free version to get you started, and we have added features and support when you need it.
Otter isn’t the only tool on the market, but using a dedicated tool that’s designed to help you run scripts is a much better choice than using Jenkins – a tool primarily designed for continuous integration – to do the same.
Remember: Jenkins is your servant; not the other way around! Using parameterized Powershell scripts is just one of the ways you can get it to work for you. For many more, why not check out free eBook “Level Up Your CI/CD with Jenkins”. Download your copy today!
