
Chocolatey
Using Chocolatey in an Offline Environment
This article is part of a series on Chocolatey for the Enterprise, also available as a chapter in our free, downloadable eBook
So, you’re thinking of using Chocolatey, and are working in an offline, restricted, or airgapped environment, —but is it even possible? Chocolatey is typically an online open-source repository, with packages that point to online installers.
Good news, it is possible! Chocolatey provides instructions on setting up offline environments. However, it will involve more than just installing a package or running a local script —You’ll need to modify packages and host them in a private repository.
In this article, I’ll cover what you’ll need to know to run Chocolatey offline. This includes internalizing your packages so they don’t require internet access and setting up a private repository using ProGet.
What Do I Need to Know For Offline Chocolatey?
Setting up Chocolatey offline is straightforward, but there are a few things you need to be confident with before diving into a private Chocolatey setup. You need to have knowledge of PowerShell and be familiar with Chocolatey packages.
Chocolatey Packages Use Powershell
Chocolatey packages are basically PowerShell scripts that point to an installer. This means your team needs to know how to write in PowerShell, as you’ll need to create or modify installation scripts to internalize packages.

Understanding Chocolatey Packages
You’ll need a basic grasp of what goes into a typical Chocolatey package. This includes understanding that Chocolatey packages are zip files that typically contain a script, but might also contain an installer as an embedded file.
How you use Chocolatey offline, either by uploading installers or embedding files, will impact how you create your packages.

Setting Up Chocolatey offline
An offline Chocolately environment is made up of 3 things:
- Internalized Chocolatey packages
- Private repositories to host packages, scripts, and executables
- Chocolatey itself.

You can get all of this done by just using ProGet.
Step 1: Creating Internalized Packages
To run Chocolatey offline, you’ll need internalized Chocolatey packages. These are modified packages that don’t rely on online installer files. You can create these in one of two ways:
⭐ Embedding the installer files within the package itself
⭐ Hosting them on an internal server and editing the package to reference these internal files instead of external URLs.
Community packages or private packages?
When internalizing packages, you’ll need to decide whether to use community packages or write your own. Using community packages is easier because everything is already written for you, and all updates are handled by the package authors.
On the other hand, creating your own packages gives you full control. You’ll be aware of what goes into the package, including silent install parameters —but you’ll need to handle updates and write new packages yourself.
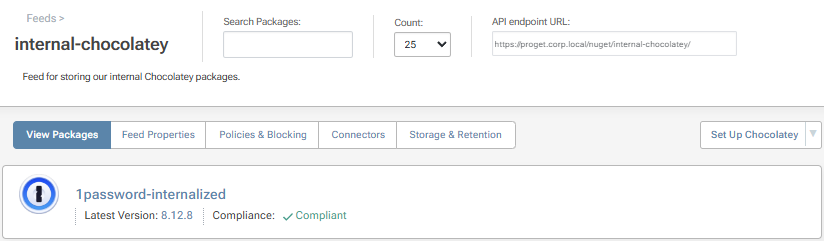
Step 2: Creating an Offline Chocolatey Feed with ProGet
Now, you’ll need to create a Chocolatey feed in ProGet to host your internalized packages.
You’ll also need to create an asset directory to host your installer files and the installation script for Chocolatey itself.
Asset Directories or Embedded Files?
While you’ll always need an asset directory for the Chocolatey installation, for the installer files you have two options:
- Store them in the asset directory
- Include them as embedded files within the packages.
Using an asset directory to host installers internally keeps the packages lightweight, and is technically using Chocolatey in the way it was intended. You’ll only need to rewrite the script for updates —or not at all if the new installer has the same name as the old one. However, this method isn’t as “all in one” as using embedded files.
Embedding files means including the installer within the package itself and editing the package to point to these internal files instead of an external source. This “all in one” approach makes it easier to manage and organize the packages. However, it requires creating a new package for each new version and can lead to overly large packages.
Step 3: Installing Chocolatey and Uploading Your Packages
The final step is to install Chocolatey itself. Start by creating an installation script for Chocolatey by copying and pasting the long script from the official documentation. Then you’ll need to customize the install script by adding the repository and username/password if you have them. Place the script in the asset directory, including the Chocolatey package itself, and then run the script.
Now, it’s just a case of uploading your internalized packages and assets. Place the packages in the Chocolatey feed, and put the installers in the asset directory or embed them within the packages.
Congrats, now you have Chocolatey working in your offline environment! 🎉
Private, Offline Chocolatey with ProGet
Using Chocolatey in offline, restricted, or air-gapped environments is possible. You just need to internalize Chocolatey packages and create private repositories.
You’ll need to know PowerShell and how packages are made. You’ll also need to decide whether to use community packages or write your own.
Phew, that was a lot to cover, and it’s a good idea to have this page on hand. If you’re thinking of using Chocolatey in your organization, why not download our free eBook Chocolatey for the Enterprise, as there’s much more beyond offline environments to wrap your head around. From package versioning, automated deployments, and license compliance, gain insight into making Chocolatey work for you. Sign up for your free copy today!
